Fedora Linux SetUp
Installation Setup, Applications and Terminal Setup.

Install and Backup(Setup):
NOTE:
In Fedora, the
sub-volumesare named in a specific way which is whyTime-shiftdoesn’t work.Timeshiftworks best with the Ubuntu style namedsub-volumes.Sub-volume names (Default) :
root →(
/)home →(
/home)For time-shift to work we need to change the names of the sub-volumes.
root→ (
@)home→ (
@home)
STEPS:
(a) Make volumes as given in the Snapshot & Add
SWAP→ extra. By clicking → Click here to create them automatically.
OR
(b) Create partition Manually:
Add
/bootabout1024 MiBAdd
/boot/efiabout100 MiBAdd
SWAPabout8 GiBAdd
/root partition of size → Varies(X GiB)Important:
change the Name: of the sub-volume from: root → @
Add
/homehome partition of size → Same as/(root) i.e (X GiB).Important:
change the Name: of the sub-volume from: /home → @home
Accept Changes
Begin Installation
WAIT FOR THE INSTALLATION TO FINISH
Reboot the system
Now setup using the Setup Wizard
Start Setup
Privacy
Location Sevices (turn off)
Automatic Problem Reporting (turn off)
Third-Party Repositories (Enable)
Skip Online Account Creation
Create login Id & password
Continue using Fedora
Configuration for SSD:
- Go to the terminal:
cat /etc/fstab#check the fstab
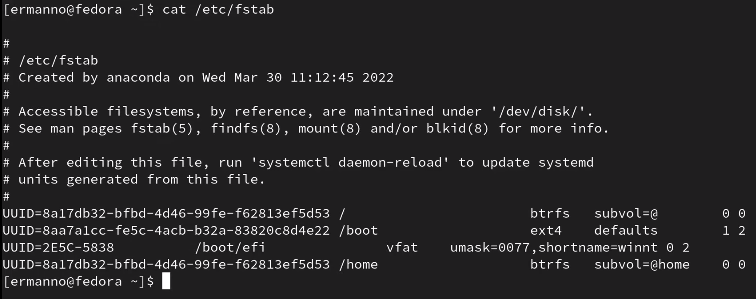
- Configuration for SSD:
sudo nano /etc/fstab
# Input password

#Add the same line of code to the file in (**/)** & (**/home)** section
#Line of code:
compress=zstd,noatime,space_cache=v2,ssd,discard=async,
For Reference:
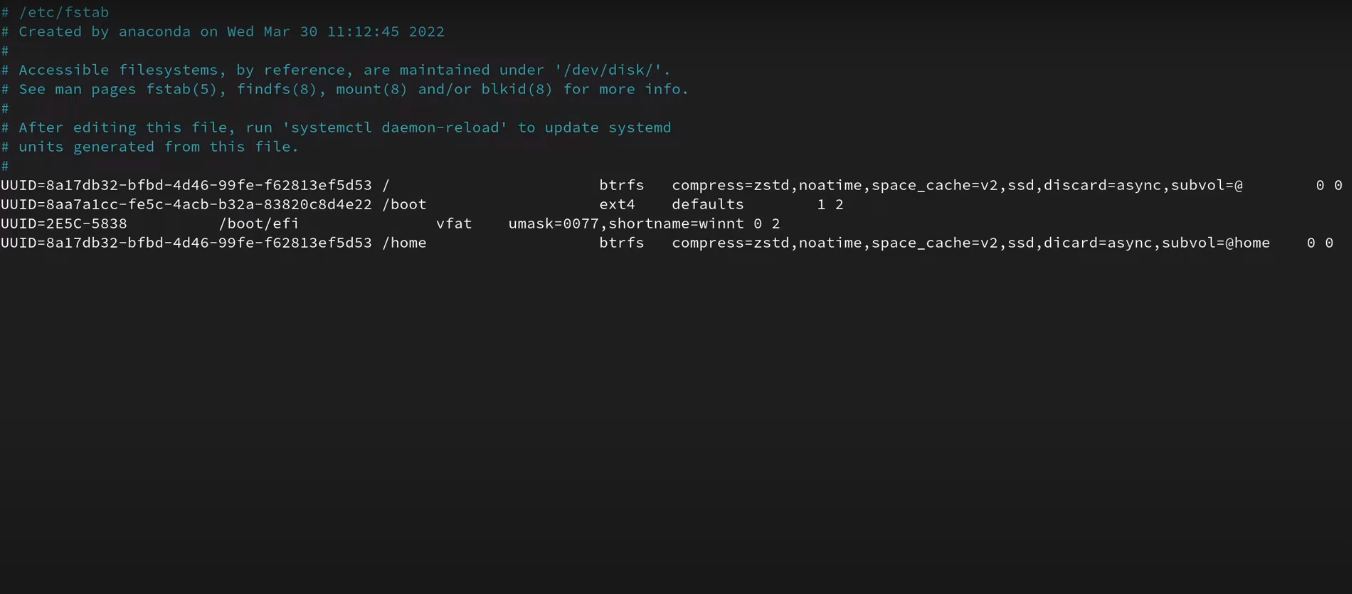
now Save the files (
Ctrl + o)and Exit (Ctrl + x).Reboot the system (
reboot)The system should reboot just fine.
After Installation Setup:
- [Change Touchpad settings (
Tap to Click)(scrolling) and Add Shortcut keys (Setting, Home-folder, Terminal) ]
- configure
dnf:
sudo nano /etc/dnf/dnf.confAdd:
gpgcheck=1
installonly_limit=3
clean_requirements_on_remove=True
best=False
skip_if_unavailable=True
fastestmirror=true
deltarpm=true
max_parallel_downloads=7
defaultyes=1
- Time-Shift Configure:
sudo dnf check-update
sudo dnf install timeshift
RSYNC
Select disk (The disk should be of type: btrfs )
Select Snapshot Levels:
Monthly → 2
Weekly → 3
Daily → 3
Boot → 2
Exclude @home
Enable BTRFS groups (recommended)→ if option available
Finish
Take a snapshot for backup purposes (Recommended)
- Update the system:
sudo dnf update
sudo dnf upgrade --refresh
- Enable
RPM FusionRepository:
free, non-free, other repository:
sudo rpm -Uvh http://download1.rpmfusion.org/free/fedora/rpmfusion-free-release-$(rpm -E %fedora).noarch.rpm

sudo rpm -Uvh http://download1.rpmfusion.org/nonfree/fedora/rpmfusion-nonfree-release-$(rpm -E %fedora).noarch.rpm

sudo dnf groupupdate core

sudo dnf install -y rpmfusion-free-release-tainted

sudo dnf install -y dnf-plugins-core
- Reboot the system
sudo reboot now
- Update:
Install
updates:
sudo dnf upgrade --refresh
sudo dnf check
sudo dnf autoremove
sudo fwupdmgr get-devices
sudo fwupdmgr refresh --force
sudo fwupdmgr get-updates
sudo fwupdmgr update
- Gnome Extensions and
Tweaks:
sudo dnf install -y gnome-extensions-app gnome-tweaks
#sudo dnf install -y gnome-shell-extension-appindicator
Enable Minimize or Maximize Button in Gnome-tweaks
Install extensions from Firefox:
User theme
Dash to Dock
Frippery application menu
Flatpaksupport:
flatpak remote-add --if-not-exists flathub https://flathub.org/repo/flathub.flatpakrepo

flatpak update
Snap support
sudo dnf install -y snapd

sudo ln -s /var/lib/snapd/snap /snap
- logout from the session
sudo snap refresh
- Configure
Git:
git config --global user.name "github-username"

git config --global user.email "github-user-email-address"
- Create
.sshfolder:
cd
mkdir ~/.ssh
cd ~/.ssh
- SSH keys:
ssh-keygen -t ed25519 -C "github-user-email-address"

eval "$(ssh-agent -s)"

ssh-add ~/.ssh/id_ed25519
- Adding SSH in GitHub:
go to
.sshfolder in the terminal (in the local machine)And copy the SSH key using Cat Command
cd ~/.ssh
cat id_ed25519.pub   #copy content
Go to GitHub
Go to → Settings
Then → SSH and GPG Keys
Click → Add New SSH
Paste the content below
Clone the required repository if needed.
Microsoft Fonts (Warning: Takes ages to install)(optional)
sudo dnf install -y curl cabextract xorg-x11-font-utils fontconfig

sudo rpm -i https://downloads.sourceforge.net/project/mscorefonts2/rpms/msttcore-fonts-installer-2.6-1.noarch.rpm
- System monitor & cleaning tool:
sudo dnf install htop bpytop

sudo dnf install bleachbit
- Multimedia Codecs:
sudo dnf install -y vlc # prefered

sudo dnf groupupdate sound-and-video

sudo dnf install -y libdvdcss

sudo dnf install -y gstreamer1-plugins-{bad-\*,good-\*,ugly-\*,base} gstreamer1-libav --exclude=gstreamer1-plugins-bad-free-devel ffmpeg gstreamer-ffmpeg

sudo dnf install -y lame\* --exclude=lame-devel

sudo dnf group upgrade --with-optional Multimedia
- For OpenH264 in Firefox I run:
sudo dnf config-manager --set-enabled fedora-cisco-openh264

sudo dnf install -y gstreamer1-plugin-openh264 mozilla-openh264
Afterwards you need to open Firefox, go to menu → Add-ons → Plugins and enable OpenH264 plugin. You can do a simple test whether your H.264 works in RTC on this page (check Require H.264 video).
# change Host Name:
sudo hostnamectl set-hosetname "fedora"
- To Install / Remove Essential Applications:
#search:
dnf search <package_name>

snap search <package_name>

sudo dnf install <package_name>

sudo snap install <package_name>

sudo dnf remove <package_name>
Screen Lock and Power Settings
Use Night Light Settings
Install Applications
- Notion
sudo snap install notion-snap
- Sublime Text:
# Install GPG key:
sudo rpm -v --import https://download.sublimetext.com/sublimehq-rpm-pub.gpg

# Stable Channel:
sudo dnf config-manager --add-repo https://download.sublimetext.com/rpm/stable/x86_64/sublime-text.repo

# Install Sublime Text:
sudo dnf install -y sublime-text
- Visual Studio Code:
sudo rpm --import https://packages.microsoft.com/keys/microsoft.asc

sudo sh -c 'echo -e "[code]\nname=Visual Studio Code\nbaseurl=https://packages.microsoft.com/yumrepos/vscode\nenabled=1\ngpgcheck=1\ngpgkey=https://packages.microsoft.com/keys/microsoft.asc" > /etc/yum.repos.d/vscode.repo'

sudo dnf check-update

sudo dnf install code
Gitignore # from the software center
GitHub Desktop # from software center
Telegram # from the software center
Spotify # from software center
Microsoft Edge # from the software center
Brave:
sudo dnf install dnf-plugins-core

sudo dnf config-manager --add-repo https://brave-browser-rpm-release.s3.brave.com/x86_64/

sudo rpm --import https://brave-browser-rpm-release.s3.brave.com/brave-core.asc

sudo dnf install brave-browser
Onlyoffice-Desktop Edition # from the software center
Whatsapp-Desktop # from the software center
OBS:
sudo dnf -y install obs-studio
Fonts:
sudo dnf install -y fira-code-fonts 'mozilla-fira*' 'google-roboto*'
Terminal Setup:
→Fish shell:-
Refer to:-
https://mutschler.eu/linux/install-guides/fedora-post-install/
ZSH shell Setup:
Can Refer to:
https://www.youtube.com/watch?v=PZTLIVQxxEY
OR
- Verify the
shellyou are using:
echo $0
#Bash  (/usr/bash)
- Installing
ZSH:
sudo dnf install zsh
- Change
shell:
chsh
#Enter password

#input
/bin/zsh   # Login Shell
- Logout from the session OR reboot
#Reboot
sudo reboot now
ZSHinitial setup:
#options
# (q) Quit and do nothing.
# (0) Exit, creating the file ~/.zshrc
# (1) Continue to the main menu
# (2) Populate your ~/.zshrc with the configuration recomended

# Input
q
- Verify the
shell:
# input
echo $0

# output
zsh
- Now install “
Oh My ZSH!”
You can refer to the official website(preferred) :
OR
Run this command:
(Prerequisite : Git, Curl)
# Install "Oh My ZSH!"
sh -c "$(curl -fsSL https://raw.github.com/ohmyzsh/ohmyzsh/master/tools/install.sh)"
Install
PowerLevel10KTerminal theme :Can Refer to:
click→ Installation
click→ Oh My Zsh
Then run the command:
git clone --depth=1 https://github.com/romkatv/powerlevel10k.git ${ZSH_CUSTOM:-$HOME/.oh-my-zsh/custom}/themes/powerlevel10k
- Get the Fonts:
#clone
git clone https://github.com/Priyansusahoo/Terminal_OH-MY-ZSH.git
copy the files in powerline-fonts to ~/.fonts folder:
cd
mkdir ~/.fonts
cd Terminal_OH-MY-ZSH/powerline-fonts/
cp * /home/PS/.fonts
- Go to Gnome-Tweaks:
Go to Fonts.
Change the
Monospace Text = MesloLGS NF RegularSave the changes
Restart the terminal
- Then change
ZSH_THEME:
- Then change
cd

sudo nano ~/.zshrc

#Edit
ZSH_THEME="powerlevel10k/powerlevel10k"
Then Configure as per your liking.
If you guys have any suggestions, feel free to contact me on:
priyansusahoo1@gmail.com


